Saturday, 13 April 2013


Friday, 22 March 2013
Thursday, 11 October 2012
Making a 2 String Jouhikko
I was made aware of the potential for this instrument which dates from the 19th century by Simon Chadwick who has written an in depth article on this and made many video recordings that can be heard on YouTube.
The original which can be viewed here is made of a block of aspen, a.resonant light hardwood, with a pine soundboard and birch pegs. The soundboard original also had a birch bark strap to hold it in place but on my example I will use animal glue.
I started with a block of alder wood and marked out the instrument from my full sized plans (now included on my Lyre making CD-rom as an added extra or separately on my website here)

I then marked the straight sides of the soundbox interior using a biscuit jointer(my router was set up for something else that day but with care it worked well)

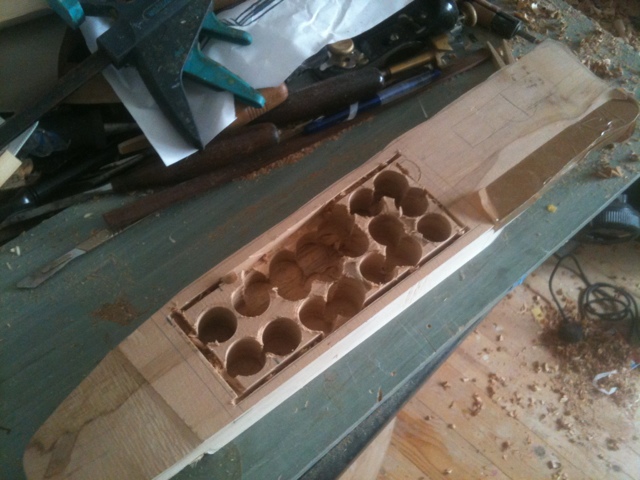
Then I used a Forster bit to hollow out the sound box.

Once this was done I used a chisel to remove the waste and clean the slanted edges in the end grain top and bottom.

 A Forster bit and biscuit jointer was used to begin to open up the hand hole.
 More to follow in a few months! please feel free to comment
The original which can be viewed here is made of a block of aspen, a.resonant light hardwood, with a pine soundboard and birch pegs. The soundboard original also had a birch bark strap to hold it in place but on my example I will use animal glue.
I started with a block of alder wood and marked out the instrument from my full sized plans (now included on my Lyre making CD-rom as an added extra or separately on my website here)

I then marked the straight sides of the soundbox interior using a biscuit jointer(my router was set up for something else that day but with care it worked well)

Then I used a Forster bit to hollow out the sound box.

Once this was done I used a chisel to remove the waste and clean the slanted edges in the end grain top and bottom.



Friday, 21 September 2012
Kantele Making update
I have been a full time luthier for over 10 years now and have been making Kanteles since the start.
The main techniques of construction are fully shown in my Kantele Making CD-Rom. but there are a few differences in the finer points of making them that I wanted to share.
In the CD-ROM I suggested inserting hard maple or beech under the tuning pin holes, I now insert a whole strip of hard maple under the soundboard. These needs a 5 piece construction for the tuning/head section
 It takes longer to build this way but it allows the free use of softer timber like spruce, alder or walnut and still safely use zither pins. Over time softer woods would wear down without the inserts.
 It helps to plane all the timbers through a thicknesses, unlike the individual inserts that can be done by bench press drill
Note: I use miller dowels to secure the laminations of all pieces now, these are self gripping and makes gluing up si much simpler.

When we get to stringing I will show how to lay out the strings now on the finished instrument!
CD-ROM available from my website
http://www.michaeljking.com
or from my alternative blog account here:
http://kantele-making.blogspot.co.uk/
The main techniques of construction are fully shown in my Kantele Making CD-Rom. but there are a few differences in the finer points of making them that I wanted to share.
In the CD-ROM I suggested inserting hard maple or beech under the tuning pin holes, I now insert a whole strip of hard maple under the soundboard. These needs a 5 piece construction for the tuning/head section


Note: I use miller dowels to secure the laminations of all pieces now, these are self gripping and makes gluing up si much simpler.

When we get to stringing I will show how to lay out the strings now on the finished instrument!
CD-ROM available from my website
http://www.michaeljking.com
or from my alternative blog account here:
http://kantele-making.blogspot.co.uk/
Thursday, 13 September 2012
Cutting List for Stick Dulcimer making course!
One element that was missing from my original Stick Dulcimer DVD was a cutting list, It is of course possible to work out what sizes you need from the plans and I had left that out. Here is a general guide for future reference, These are the finished sizes so please allow for final sanding or planing by adding a little to the length,

Neck: Gdg 492mm Long 26mm-28mm thick and 32 depth
Dad 560mm Long 26mm-28mm thick and 32 depth
Body sides: 410 Long by 28mm wide and 1.5/1.8mm thick (X 2)
Front and back: 350 long by 135mm wide and 3mm thick
Fingerboard: Gdg 382mm by 26/28mm by 5.5mm
Dad 430mm by 26/28mm by 5.5mm
Fingerboard: Gdg 382mm by 26/28mm by 5.5mm
Dad 430mm by 26/28mm by 5.5mm
Please note, you can make the neck of of several pieces to build up the heel and head, you can also utilise scraps from a guitar and join up several pieces for the backs.
more information on timber and materials is here:

Friday, 17 August 2012
Sutton Hoo Lyre replica by Michael J King Part 2 of 2 New Tuning key
My complete and updated Lyre making CD-Rom with plans for 7 plucked lyres and added bonus of 4 Bowed ones is available here:
http://www.michaeljking.com/build_your_own_lyre.htm
The updated file with replacement tuning key plan is to be found as a free download on my instrument plans page here: http://www.michaeljking.com/plans.htm
The Lyre featured in this Video will be part of the Display at the Sutton Hoo Visitors centre
Monday, 30 July 2012
Kantele from The year 2000!

A little nostalgia this time......
My interest in Kanteles goes a long way back to my early 20's but the reference point was the fabulous book of old Kantele drawings by Rauno Nieminen published in 1984 which I had ordered from Finland via fax (amazing how we did things before the Internet took hold)
I took a year to make it on and off, mostly by hand, completing in the year 2000 in my back garden.

Made from a recycled pallet runner of Poplar and pinewood, It was always more artifact than an instrument, smaller than the 5 string Kanteles I make today but it does play. It has had several different stringing and tuning pin stages, painted several times but now in black it has wooden violin pegs and .010" strings tuned to B, c#, d#', e f#
The sizes of this one are100mm wide and 480mm long
Introduction video
Playing example
The instrument now has a new home in Walthamstow, London E17, birthplace of William Morris and my own instrument making Career.

For my website and current Kanteles see here
Subscribe to:
Posts (Atom)